The ITX build we’re exploring stands out as a remarkably straightforward assembly process. Its compact size, along with quiet and efficient cooling, makes it a compelling choice for a variety of gaming experiences. While the focus is on achieving high frame rates at 1440p resolution, this build demonstrates capability even at 4k resolutions. Let’s delve into the build process and then assess its performance through gaming benchmarks
Parts
CPU: Intel i5-13600K

For the CPU, the Intel i5-13600K takes the spotlight. Boasting 14 cores with 6 high-performance cores capable of boosting up to 5.1 GHz, this CPU shines in gaming performance. It’s been hailed as the top gaming CPU by certain sources, although that status might shift with the anticipated arrival of the AMD 7800X3D. Nevertheless, the i5-13600K remains a solid choice. I managed to snag it at a discounted price of $350 from Best Buy.
The Intel i5-13600K offers flexibility with memory options, supporting both DDR4 and DDR5. Opting for DDR4 can be a budget-friendly choice, although it requires a BIOS update for compatibility.
RAM:Corsair Vengeance DDR5 5600MHz

In this setup, I’ll be leveraging the latest DDR5 technology, specifically 32GB of Corsair’s Vengeance DDR5 5600MHz memory. I managed to snag this set on sale from Amazon for approximately $120. It’s crucial to choose a lower-profile memory to ensure the case can close properly, as taller options like the Corsair Dominators won’t fit.
Motherboard: ASUS ROG Strix B760-I

The ASUS ROG Strix B760-I motherboard was my choice for this build. It’s crucial because it supports DDR5 memory, and it boasts a range of features like plenty of USB ports, Wi-Fi 6E, USB-C both on the back and as a front panel connector—a necessity for our case—along with 2 M.2 slots and substantial VRM heatsinks. Visually, it’s quite appealing too. I acquired this motherboard from Amazon for $220.
Storage: Samsung 970 EVO Plus

The storage solution I opted for is the Samsung 970 EVO Plus, providing ample storage with a 1TB capacity. Should the need arise for additional storage, there’s an extra slot available for future upgrades. Although the second slot on this motherboard is situated on the back, it shouldn’t pose a significant challenge to access if required. I managed to snag this SSD on sale from Best Buy for $55.
Case: NZXT H1 v2

The case chosen for this build is the NZXT H1 v2, renowned for its ease of assembly and sleek design. Available in both black and white variants, I opted for the two-tone white and black, which offers a clean and modern aesthetic. Its compact size makes it ideal for desktop setups, and it comes equipped with essential components like a 140mm liquid cooler tailored for the i5, a PCIe Gen 4 riser for the graphics card, and a 750-watt power supply with pre-routed cables. Remarkably, this case often goes on sale at Best Buy for just $200, making it an exceptional value considering its features and included components.
GPU: 4070 Ti Eagle OC

The GPU selected for this build is the Gigabyte 4070 Ti Eagle OC. With its widespread availability, I acquired mine from Newegg for $850. This GPU delivers solid performance across various resolutions, excelling particularly in 1440p gaming with high frame rates. Compared to its counterparts, the 4070 Ti offers approximately 20% faster speeds than the 3080 while approaching the performance level of the 7900XT, all at a slightly lower cost and with reduced power consumption.


The selected card measures 301mm in length and 61mm in height, slightly exceeding the case’s recommended height by 3mm but still fitting comfortably. I initially attempted to install an ASUS TUF 4070 Ti, which boasts a thicker cooler at 65mm in height. However, due to this increased height, reinstalling the case cover became challenging without removing the dust filter and making modifications to the panel. Thus, it’s advisable to verify your card’s dimensions and ensure it aligns closely with the recommended 58mm height for optimal compatibility.


Examining the gaming benchmarks, the performance of this machine is exceptionally satisfying. It consistently delivers high frame rates at 1440p, and even at 4k resolution, gaming experiences are impressive across various titles tested at high settings.
Considering monitor options, this setup pairs well with a high refresh rate 1440p monitor like the LG UltraGear 27” OLED 240Hz display. Alternatively, it could serve excellently as a living room gaming PC connected to a large 4K display.
In terms of GPU thermals, after running the Heaven benchmark for over an hour, the average temperature sits at a comfortable 67 degrees Celsius. Moreover, the system’s fan noise remains barely noticeable, even when placed just a few feet away on the desk.
However, during a rigorous multi-core test in Cinebench R23 for approximately 10 minutes, the i5 processor tends to heat up significantly. Therefore, thermal management should be a consideration for extensive CPU-intensive tasks.
Nonetheless, for gaming, both the CPU and GPU maintain respectable average temperatures in the mid-60s, which are well within acceptable limits for a compact system like this one.
Considering the overall package and performance, this build comes together nicely for around the $1800 mark. It offers ease of assembly, compactness, and excellent cooling capabilities.
Step-by-Step Assembly Guide
- Lower the CPU into the socket, ensuring the arrow on the top right aligns with the socket arrow. Once it’s in place, lower the latch to secure it.

- Install the Samsung SSD.

- Install the Mounting Hardware for the Water Block
Align the included backplate with the four holes on the back of the motherboard. Install the four standoffs on the other side of the motherboard.

- Prepare for Motherboard Installation:
Unscrew the two screws at the top of the case. Flip the radiator out of the way. Slide the motherboard in through the side and align it with the standoffs. Secure the motherboard to the standoffs using the screws included with the case.

- Connect Front IO and Power Cables:
Plug in the front IO, USB-C front panel connector, and the USB 3.2 Gen 1 header on the right side of the motherboard. Connect the HD audio connector and USB on the bottom of the motherboard. Plug in the 24-pin motherboard connector on the right and the 8-pin CPU power connection at the top. Refer to the motherboard manual to verify the correct locations for these connections.

- Tidy up the cables to make room for the water block installation.
- Install the Water Block:
If the water block already has thermal paste applied, proceed to the next step. Otherwise, apply your own thermal paste to the CPU.

- Align the cooler with the four standoffs. Tighten the cooler with the four thumb nuts in a criss-cross pattern to ensure even pressure across the CPU.

- Install the RAM
Ensure the notch on the RAM stick is correctly aligned with the slot. Apply even pressure until you hear both ends click into place.

- Connect the AIO Pump
Connect the pump from the AIO to the AIO pump header on the motherboard (refer to the motherboard manual for the correct header).
- Install the PCIe Riser Cable:
Pull the PCIe riser cable up to create as much slack as possible. Align it with the PCIe slot and push it in until you hear it lock.

- Close the radiator and screw it back in.
- Install the GPU
Lower the GPU into the case and screw in. Lift the door in the case to access the GPU slot. Connect the two 8-pin power connectors to the adapter included with the 4070 Ti. Ensure there is enough room behind the door to hide the adapter, keeping everything looking clean.

- Final Setup
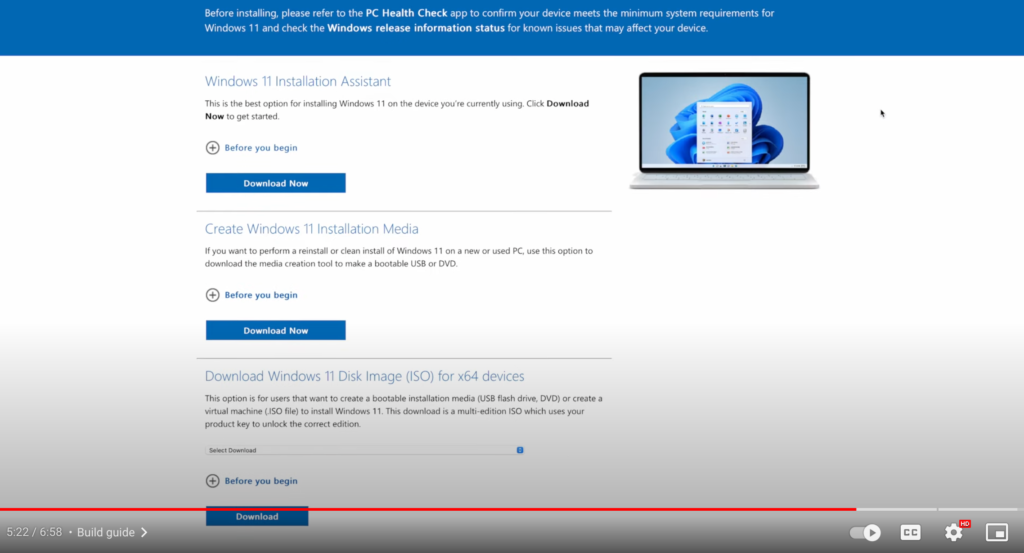
Turn on the system and enter the BIOS. Set the memory to XMP (Extreme Memory Profile). Create a Windows installation drive and install the operating system.

Enjoy the compact and clean look of the build, appreciating the two-tone white and black design.
By following these detailed steps, the build in the NZXT H1 case is complete, resulting in a compact and aesthetically pleasing setup.