A few weeks ago, I reviewed the Nanoq S and was thoroughly impressed. It’s an incredibly stylish premium case, perfect for a high-end build. At the end of that video, I expressed my interest in exploring the larger 16L version to see how it compares. Thanks to Thor Zone, I now have the Nanoq R to review.

In my previous video, I mispronounced the name—it’s correctly pronounced “nanuuk,” which means polar bear.
Size and Compatibility
So, what are the differences? For starters, the Nanoq R is larger, with a 5L difference compared to the S, bringing it closer in size to the M1EVO or Dan C4, whereas the S is more comparable to the T1 or Dan A4-H20. Both models are mini-ITX only, but the increased size of the R allows for greater cooling potential, an easier build process, and compatibility with larger components.


The Nanoq S I have is in the Carbon color, which is essentially black, while the Nanoq R is in Graphite, a blueish-gray hue. The blue tint is more pronounced than expected from the renders, varying with lighting conditions, but it looks unique and appealing.

Build Process
Let’s dive into the build process. The Nanoq R features seven top panels, each with a specific function. The center panel houses the branding and power button, the outer four are magnetic and reveal fan mounting points, and the two panels adjacent to the center slide up to unlock the outer shell.

Inside, you’ll find an accessories box with individually foam-surrounded screws, adding to the premium feel. As with the Nanoq S, the interior is minimalistic, featuring steel rods connecting the front and back panels, which are flat on one side for easy radiator or fan mounting.

Starting with the lightrays and handles, which I found easier to install before any components, these are optional add-ons available with the case. Next, the top and middle bars offer mounting points for the motherboard standoffs.

For this build, I used an ASUS X670E-I motherboard with a 7800X3D CPU, 32GB of DDR5-6000 RAM, and a 1TB 980 Pro SSD.

The power supply unit mounts on the left of the motherboard, accommodating up to an SFX-L power supply. I’ll be using the Corsair SF750, and custom length cables from Bespoke Baka.

Cooling Options
At the bottom, you can fit a 280mm radiator or two 140mm fans. In my Nanoq S build, I used an AIO and was pleased with the results, so this time, I’ll try air cooling. Note that sandwich-style layouts like this limit CPU cooler height. The case features an adjustable center spine for more versatility in component selection. For this build, I’ll use two 140mm Noctua fans on the bottom.
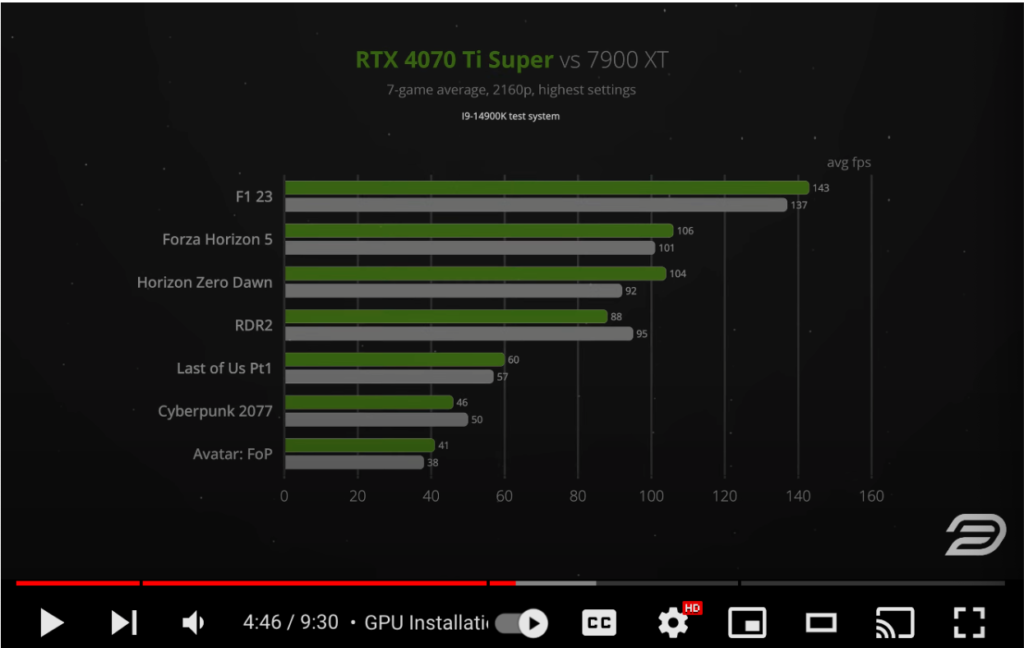
I’ll be installing the ASUS TUF 4070 Ti Super, a 3.25-slot GPU, to see how well the case can handle a larger card with air cooling. If you’re interested in the 4070 Ti Super, I reviewed it last month and will link that review in the description.
This pre-production unit has only one mounting point for the GPU, other than the riser cable, but future production units will include additional mounting points. For now, I’ll zip-tie the GPU for stability.
After installing the GPU, I’ll adjust the spine to create space. I’ll install a Noctua L9-65 CPU cooler, which should suffice for the 7800X3D at stock settings but may lack headroom for turbo or overclocking. For hotter chips, consider a smaller GPU to fit a more substantial cooler like the Noctua NH-L12s.
The case includes magnetic dust filters for the cover. Sliding the cover back on was easier than with the Nanoq S, which snagged on the AIO tubes and riser cable.
Performance Testing
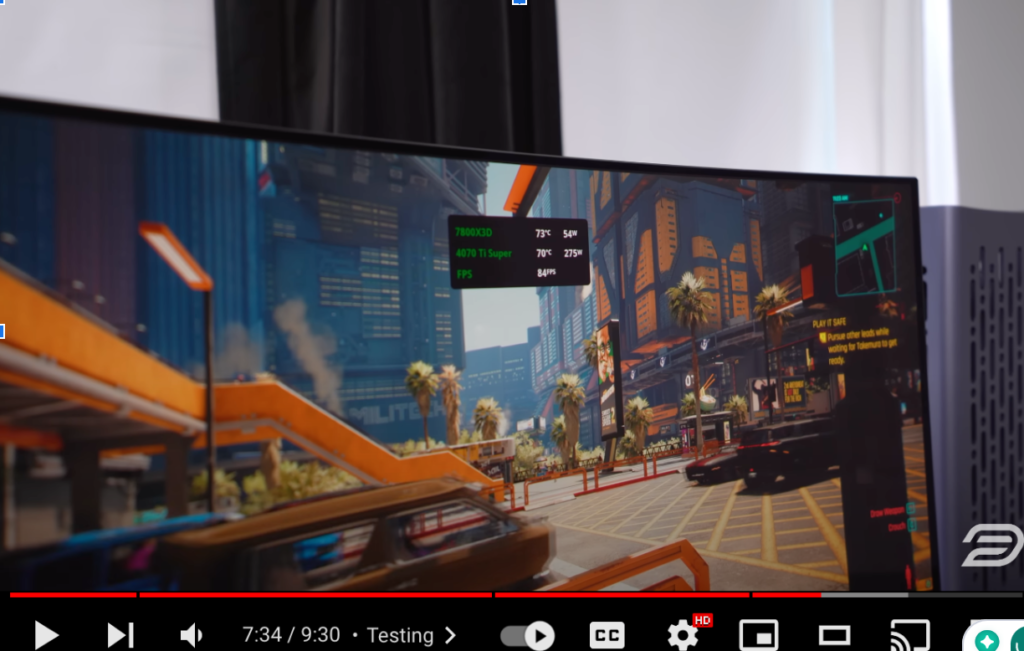
Testing with Cyberpunk 2077 at ultrawide 1440p resolution with ray-traced ultra settings, the 7800X3D remained in the mid-70s, and the GPU stayed at or below 70°C. The 140mm fans contributed to the cooling but added noise, measuring 44-45 decibels.
In other CPU-intensive tasks, temperatures rose into the 80s, with fan noise reaching around 50 decibels. While the Noctua cooler is impressive, I recommend using an AIO for this case or a smaller GPU with a more robust air cooler.
Final Thoughts
Thor Zone sent these units to reviewers for feedback. In my previous review, I noted the need for additional GPU mounting points. For vertical mode stability, I suggest adding clip-on feet to cover more surface area.
Overall, the Nanoq R is a solid choice for those looking to use larger components while maintaining a compact form factor.